
Configure the Informatique Facile PBX installation: information, license, network, mail, localization, alerts and integrations. These settings concern the system; make sure you have the appropriate permissions before modifying a shared service.
Finding the New Pages
The former Configuration page is now distributed across the System menu. Settings are spread across the pages of the System menu. Old addresses open their current destination. Use the links below to find each procedure.
Each settings page gathers its drafts under a single Save. Cancel discards the entry. Switching sections keeps the draft; leaving the page prompts you to handle it. Test sending and temporary logging are immediate actions.
Installation Information
Current access: System → License and Information → Installation. See the current guide.
View the version, node and group identifiers, operating system, kernel, processor, memory and disk. Expand the necessary details, use the copy function to share an identifier, and Refresh to request measurements again.
The HTTPS certificate shows, among other things, issuer, subject, expiry, covered names and fingerprint. The management service connection status distinguishes the last exchange and pending, in-progress or acknowledged commands. A measurement older than two minutes is not enough to confirm the connection is current. If a source is unavailable, its information is unavailable; others may remain visible.
License
Current access: System → License and Information → License. See the current guide.
Check the license status and limits. In offline mode, enter the key provided for this installation in License and Information → License, then click Save. Review the result and the quotas. A reload requires a synchronization; it does not by itself increase the subscribed rights. For reload commands and their partial results, see PBX Update.
Preparing the Network
Current access: System → Network → Internet Access. See the current guide.
For cards, VLANs, routes and reserved ranges, see the Network Plan.
A network change can interrupt telephony and your access. Prepare DNS names, addresses and network rules with the installer before starting.
| Field or Choice | Purpose | Possible Values | Example |
|---|---|---|---|
| Network Scenario | Determines the addresses and controls needed | Scenarios offered by the page | Scenario matching your network |
| Public Name | Full name used to reach the service | DNS name, depending on scenario | telephonie.example.test |
| Interface Address | Server's local address | Address present on the chosen interface | Address of the server's network |
| Announced Public Address | Address announced to peers | Public address depending on scenario | Address provided by the installer |
| Media Address | Voice path | Value appropriate to the scenario | Address intended for audio streams |
| Certificate | Protects encrypted connections | Choice offered and compatible with the name | Certificate covering the public name |
- Choose the scenario and fill in its visible fields.
- Save the configuration request.
- Review the preview produced by the agent.
- Run the external reachability test.
- If the check allows proceeding, open the application and read the confirmation.
- Check the acceptance of call interruption, then confirm.
- Wait for reconnection and check the final status.
A saved request is not yet applied. A failed test normally blocks application; the private scenario may allow an unverified application. Each application regenerates the settings and restarts the services, even if the values appear unchanged. A certificate failure can interrupt the operation before modification.
After changing the public name, explicitly reconfigure the phones: their reprovisioning is not automatic. A successful local WSS connection does not guarantee public access on port 443.
Internal codecs set the offered audio formats. SIP listeners display the actually observed ports in read-only mode. Previously declared network settings from a client do not replace the installation's applied configuration.
Configuring Email Sending
Current access: System → Emails → Sending. See the current guide.
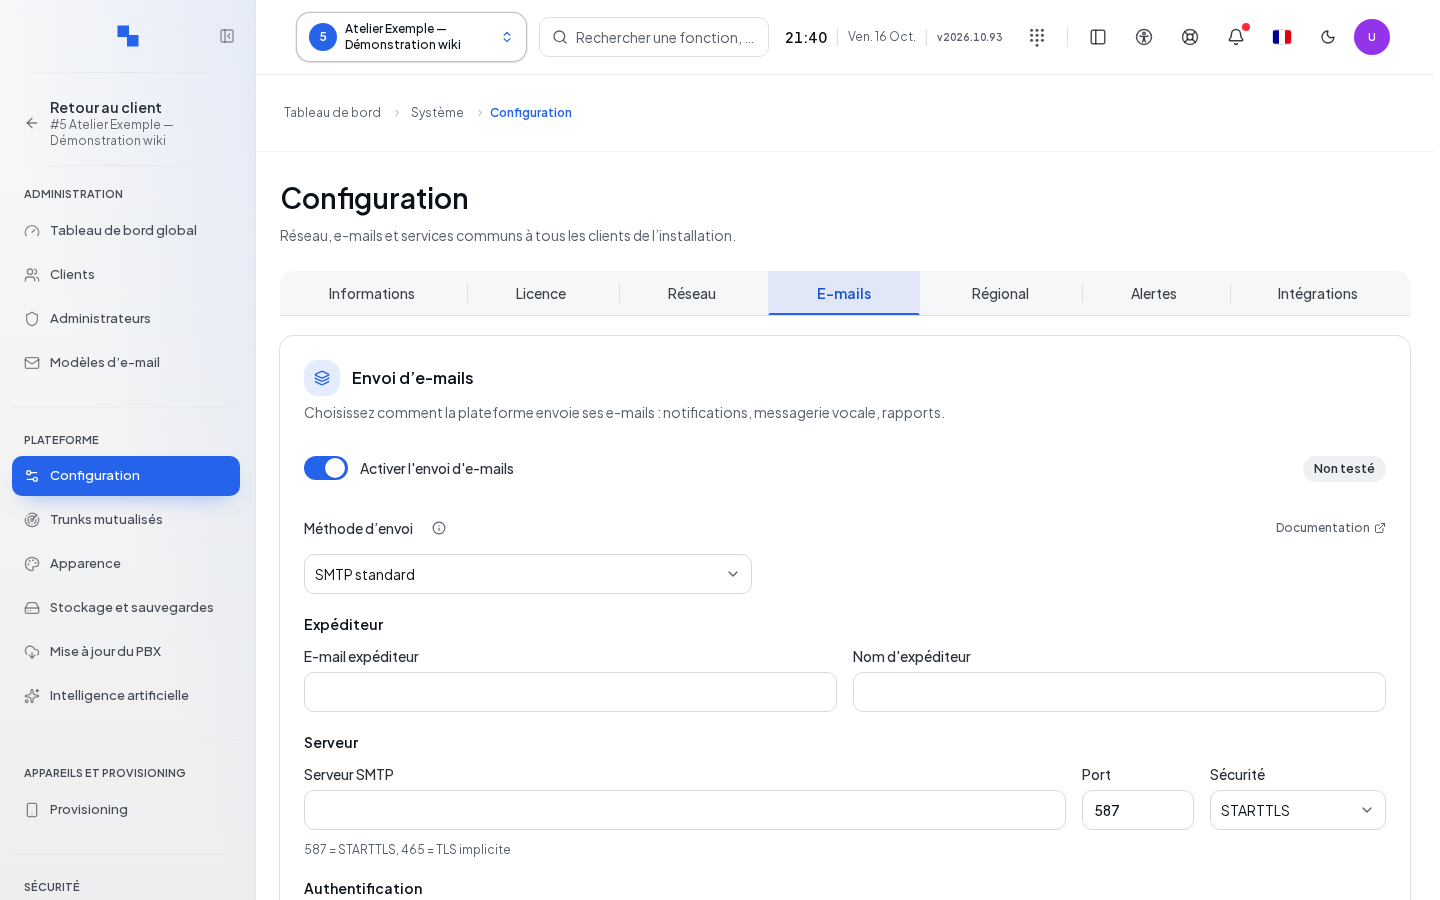
In Emails → Sending, choose Sending Method. The menu includes standard SMTP, Microsoft 365, and Google. The form adapts to the method; the permissions and the Documentation link provide the provider's requirements.
| Field | Purpose | Possible Values | Example |
|---|---|---|---|
| Enable Email Sending | Authorizes the system service | Enabled or disabled | Enabled after configuration |
| Sender / Name | Address and name presented | Address authorized with the provider | notifications@example.test |
| Server | SMTP server, for an SMTP method | Name provided by the mail administrator | smtp.example.test |
| Port | SMTP port | Integer from 1 to 65,535 | 587 |
| Security | SMTP encryption | None, STARTTLS, or TLS; 587 generally corresponds to STARTTLS, 465 to implicit TLS | STARTTLS |
| Username / Password | SMTP authentication if required | Sending account credentials | Technical mail account |
| Organization ID / Client ID | Microsoft Graph application | Required with sender address for Graph | Your organization's credentials |
| Client Secret / Certificate / Certificate Password | Graph application authentication | Secret or certificate depending on the chosen configuration | Values provided by the Microsoft administrator |
| Service Account JSON Key | Google service account with domain delegation | JSON file, 64 KiB max on import | Account authorized to send for the domain |
| Client ID / Client Secret / Refresh Token | Google OAuth account | Values obtained after consent | Application authorized for the sender |
| Name Announced to the SMTP Server | EHLO name in Advanced | Empty for default, or requested name | Mail server name |
Google methods include Gmail API with a service account or OAuth, Gmail SMTP with OAuth, SMTP relay and password. Do not confuse the Gmail API authorization with the one requested for SMTP OAuth: the screen shows the scope to authorize. For Microsoft Graph, review Microsoft 365 Permissions and the retention choice in sent items.
A hidden secret remains stored if you do not change it. Clear prepares its deletion and displays "Will be cleared on save." Save applies the form and clears the old system test verdict.
A removed legacy Microsoft method can no longer be saved: reconfigure with Microsoft Graph. The message states that existing sends continue; do not remove old access before preparing the replacement.
Sending a Test Email
- Save all changes to the form.
- Check the recipient address, pre-filled with the administrator's address when known.
- Click Send Test.
- Read the result, then check the inbox and junk folder.
The button is unavailable if the configuration is not ready, if an entry has not been saved, or during the operation. A message accepted by the provider does not guarantee final delivery. The last system test is remembered; at the client level, the test result only applies to the current session.
Localization
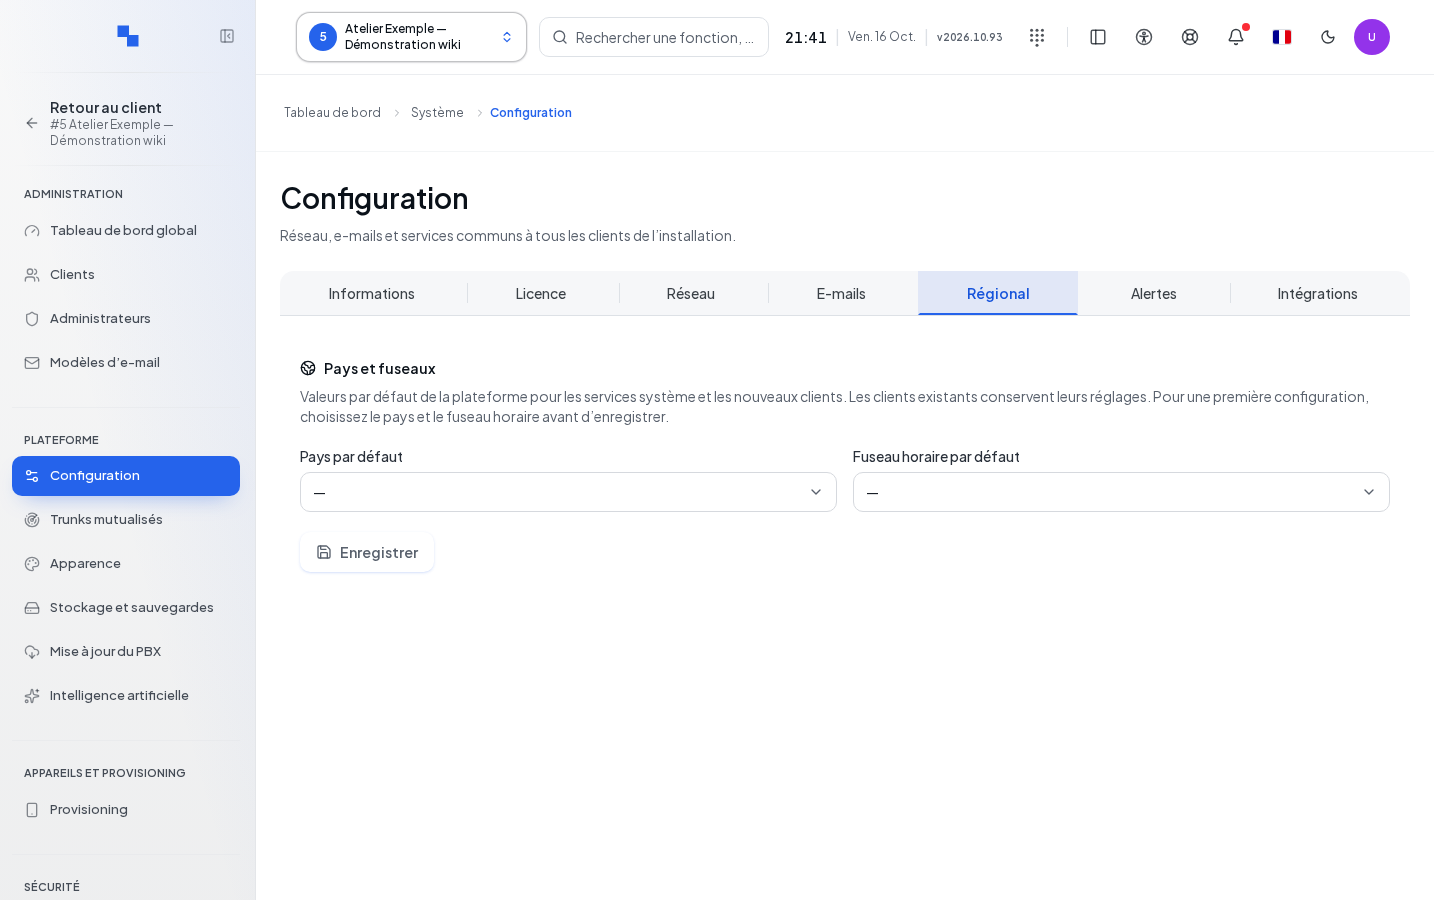
In System → Clients → Default Values for New Clients, choose the default country and time zone. Both are required for initial configuration. Save, then check dates and proposals made to a new client. These values are offered to new clients; they never modify existing clients. The New Clients Time Zone is distinct from the Updates Time Zone.
Alerts
Current access: System → Alerts and External Monitoring → Recipients and Thresholds. See the current guide.
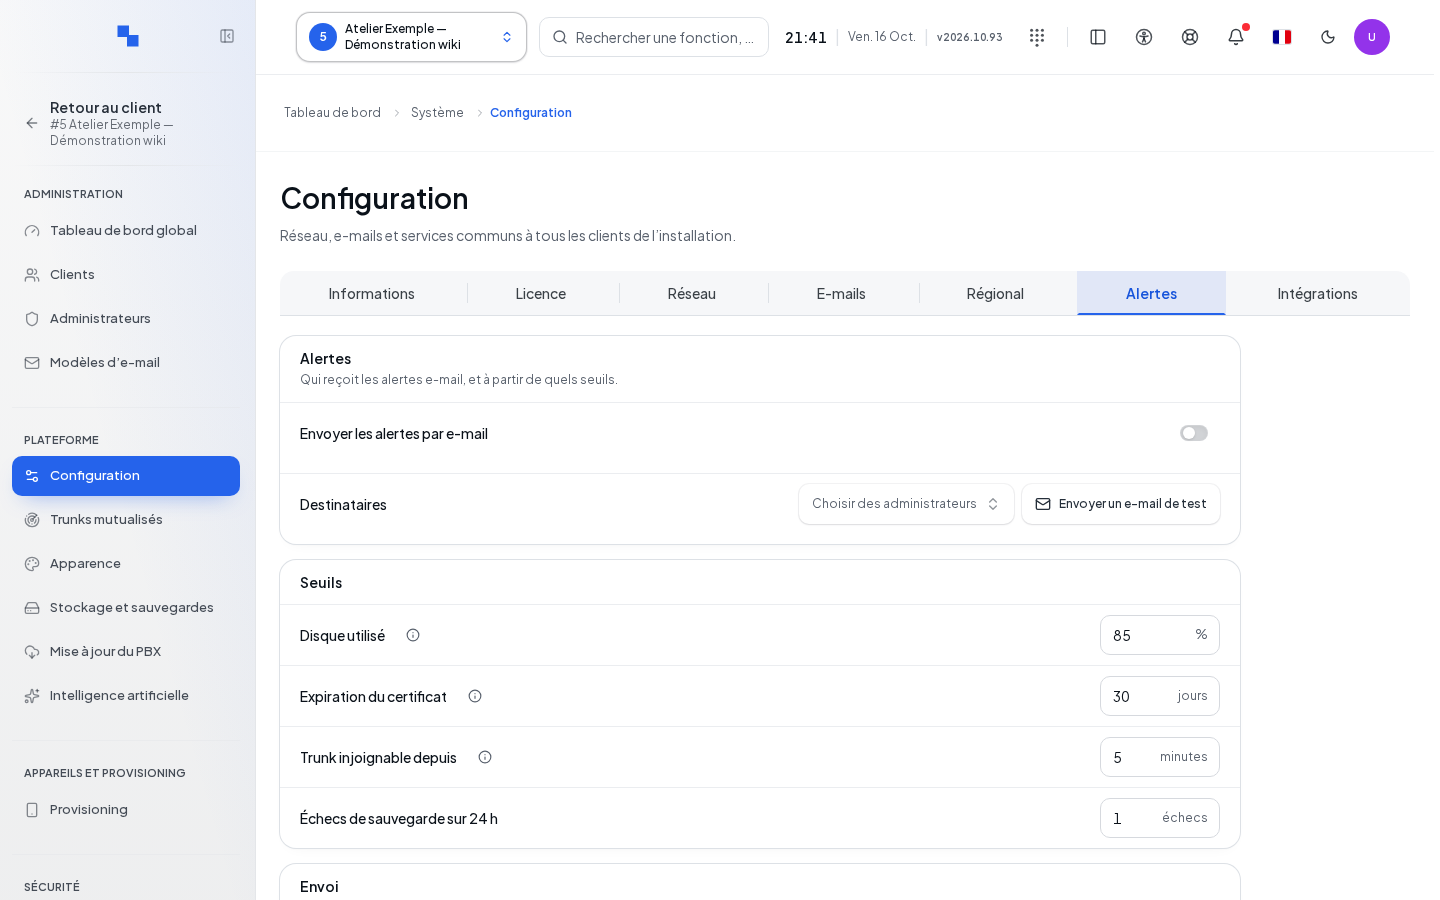
Enable the desired notifications and choose the recipient administrators. Select severities and incident types; keep at least one required choice in each group. Thresholds cover disk space, certificate expiry, and trunk failures, among others.
| Setting | Purpose | Possible Values | Example |
|---|---|---|---|
| Recipients | Administrators notified | Accounts offered | On-call administrator |
| Severities / Types | Incidents to notify | Selection of options offered | Critical incidents |
| Disk Space | Usage triggering the alert | 1 to 100% | 85% |
| Certificate | Advance notice before expiry | 1 to 365 days | 30 days |
| Trunk | Outage duration before notification | 0 to 1,440 minutes | 5 minutes |
| Backup Failures | Number of failures before alert | 1 to 1,000 | 2 |
| Grouping | Notification grouping window | 0 to 60 minutes | 5 minutes |
| Reminder Interval | Time between reminders | 5 to 10,080 minutes | 60 minutes |
| Resolution | Informs of return to normal | Enabled or disabled | Enabled |
| Reminders | Repeats unacknowledged alert | Interval offered | Organization's interval |
Save the valid and modified form. Test sending to the intended recipient separately. Acknowledgment stops the related reminders; it does not fix the cause of the incident.
Integrations and Logging
Current access: System → Integrations → Directory (search.ch). See the current guide.
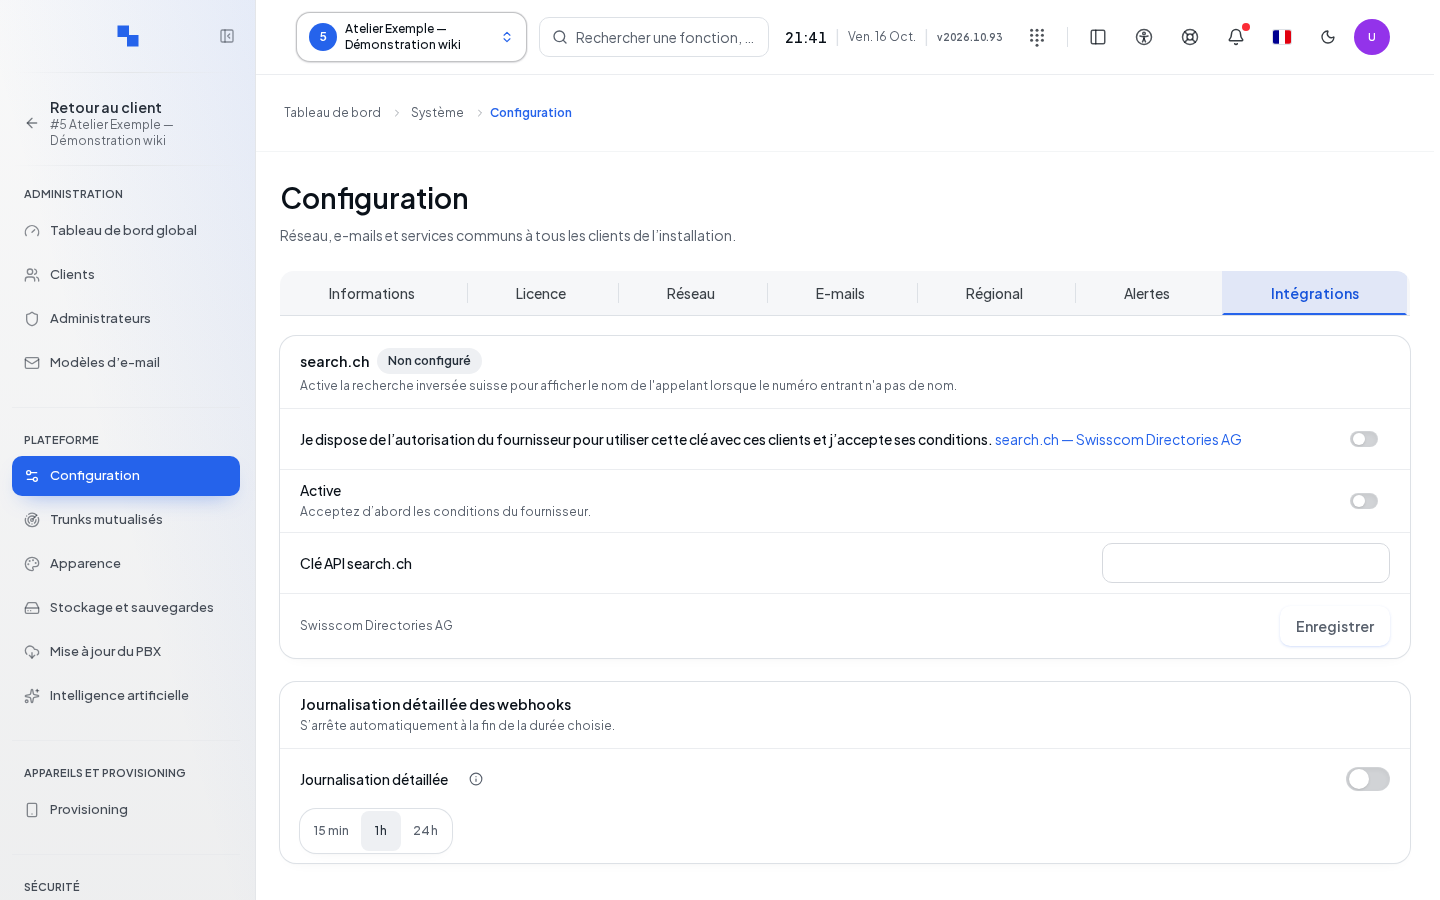
For search.ch, enter the key, explicitly accept the terms, enable, then save. Activation requires a key and consent. A key left empty keeps the existing secret; explicitly clearing it deletes the key immediately.
In System → Queues and Webhooks → Temporary Webhook Logging, detailed logging is enabled for a chosen duration and expires automatically. The command takes effect immediately. It logs identifiers and metadata such as method and content type; it does not add the body, URL, or secrets. Check the displayed end time and disable it once diagnostics are complete.
Verifying the Result
Return to each modified page after review. For network, check connection and calls after applying; for mail, check a reception; for alerts, check the test. Saving a form is not proof the remote service is working.
If It Doesn't Work
"Read not authorized." means you should check the role of the connected account. If an information source is unavailable, retry reading it and keep the diagnostics. If the network disconnects your session, wait for the restart to finish and use the intended name. For emails, fix the authentication, permission, or server diagnostic shown without copying any secret into a help request.