
Preparing your phone
Open Phone with your Informatique Facile PBX user account. The Web phone uses your microphone and network connection. Prepare a headset and allow microphone access in the browser.
The connection indicator distinguishes Connected, Connecting…, SIP failure, and Offline. SIP here refers to your phone's connection to the calling service. An open account session does not mean the phone is ready to dial.
The dial panel offers Dial and Recent. Its shortcuts open Settings for microphone or headset, Contacts, and Voicemail. Call forwarding and services leads to Settings › My calls; follow the forwarding configuration steps, then use the common Save button.
The central panel keeps calls accessible while you browse other sections. Minimizing a call card does not hang up. On mobile, the call bar lets you return to its controls.
On a wide screen, the arrow near the Dial and Recent tabs collapses the entire keypad column to the side. Click the Keypad tab to reopen it; it shows the number of ongoing calls when there are any. The entered number, chosen tab, and calls are preserved. The BLF panel also collapses to the side; its tab lets you reopen it.
On a wide screen, the keypad panel and the shortcut keys panel can be resized: drag their border. On the keyboard, place focus on the border then use the left and right arrows; Home and End give the minimum or maximum width, Enter or a double-click restores the original width. The chosen width is remembered by this browser. Conversations, client chat, meetings, and support use the same border.
Dialing and choosing your identity
| Field | Purpose | Possible values | Example |
|---|---|---|---|
| Number or contact | Call destination | Internal number, external number, or contact to select | Internal number 201 |
| Caller identity | Number presented to the caller | Authorized identities from the list | Front desk number |
| Number masking | Requests a hidden identity | Only if your account allows it | Disabled for an identified business call |
- Enter the number or search for a contact.
- If you entered a name, choose a number from the suggestions.
- Check the proposed identity.
- Click the call command.
- Wait for ringing then the answer.
The keypad adds digits, * and #. The clear command removes the entry according to the button shown. Redial resumes the last dialed number. Calls wait until the phone is registered; a requested but unauthorized masking blocks dialing.
Below the keypad, recent calls show the caller's name when known, otherwise their number, an icon indicating the call direction (incoming, outgoing, or Missed), and the time; hover over the time to read the full date. Clicking a row calls that contact back. With no history, "No recent calls." is displayed.
Recent and Favorites offer Call back or Call: these buttons start a call, they do not just open a card.
Call as, on a contact, opens the choice of identity to remember for that number. Choose Default, an authorized identity, or Hidden number if allowed. The selection is saved immediately. If this identity is no longer available, the default number is used and the screen reports it.
Speed dial codes use the available shortcuts. Their creation is described in Personal Settings.
Answering and acting during a call
An incoming call card or window shows the available caller. Use the answer command to pick up, or the reject command to decline the call. On mobile, the appropriate window gives access to the same decisions. If the microphone is denied, address the message before trying again.
| Command | Effect | Point to check |
|---|---|---|
| Mute / unmute microphone | Mutes or restores your voice | The call continues during the mute |
| Hold / resume | Suspends or resumes your conversation; with a headset controlled by the phone, the headset stays off-hook during hold | Check the active card if multiple calls exist; the headset's hang-up button also ends a call on hold |
| Keypad during the call | Sends a tone to the caller | Useful for voice menu selections |
| Choose audio output | Opens available outputs | Control where you hear the conversation |
| Video | Turns the camera on or off | Requires an established call and camera permission |
| Screen sharing | Requests a window or screen from the browser | Check the selected surface before sharing |
| Background blur | Adds or removes blur | Video must be active; loading may precede the effect |
| Notes | Opens entry linked to the caller | Local storage on this device and account |
| Number copy | Copies the presented number | Wait for clipboard confirmation |
| Card minimize | Keeps the call in a compact view | Does not end the conversation |
| Hang up | Ends your call | Check the relevant card |
When you leave Phone during a call (for example to go to Chat or Contacts), the call moves to a small floating window. Drag it by its handle anywhere in the window, including over the menu or chat panel; it always remains fully visible and returns onscreen if you resize the window. Its position is remembered for subsequent calls in the session. On keyboard, focus the handle and use the arrow keys; a double-click or Recenter puts it back in place. Reopen call window returns to the full view. On a narrow screen (phone), the call stays embedded in the page.
Digits typed on the keypad can be sent to the active call's voice menu when no text field intercepts them. "Tone not confirmed. Check your caller's response before trying again." asks you to listen to the response before repeating.
Notes are not a folder shared with your colleagues. "Unable to save notes on this device." means local saving failed.
Transferring directly or announcing the call
Direct transfer sends the call to the destination without prior conversation. Assisted transfer first lets you speak with the recipient.
- Open the transfer panel for the established call.
- Enter a valid number or select a suggestion.
- For a direct transfer, use the corresponding command and wait for the result.
- To announce the call, start the consultation with the recipient.
- In Assisted transfer, read the status then choose Complete transfer or Cancel and resume call.
Reload status checks the ongoing consultation. Close does not let you hide a still-active consultation as if it were finished. An unreadable status or a failed reload may leave a consultation ongoing on the service side: reload before another action.
You can also drop an established call onto a contact to request its transfer, or drop a destination onto the card. An ongoing transfer or conference operation may prevent the drop.
"Invalid transfer destination." asks you to correct the number. "The call to transfer is no longer active." asks you to check the conversation. Transfer started confirms the launch, not the recipient's answer.
Merging calls and inviting a caller
When two calls are established or on hold, the conference command lets you merge them. Dropping one call onto another also prepares this merge. Both calls must be different and still active.
After launching, wait for the confirmed conference status. The panel may let you add an existing call or invite a new number. Enter the destination, launch the invitation, then check whether it is ringing, has joined, or has failed before continuing.
The commands in the participant list enable the actions proposed for each, including removal. Ending the conference acts on the current conference; check its participants before this decision. A failed reload does not equate to an empty conference.
Parking and retrieving a call
Parking places the call in a numbered slot that you or a colleague can retrieve.
- During the established call, use the park command.
- Note the slot indicated in the confirmation.
- To retrieve, dial this slot or click its card in Parked calls.
- Wait for the conversation to be established.
"No parking lot configured. Ask the admin to create one in Settings." means no parking area is available. A failed reload of parked calls is not an empty area.
Using the switchboard and team calls
The Switchboard shows its calls in queue and on hold. Answer on a queued call and Resume on a held call bring the call to your line: pick up your handset. Hold puts the call back on the switchboard's hold.
Your phone must be registered to receive the call. The panel reloads queues and holds regularly; an error on one does not remove the need to check it.
The team calls table is presented in the Queues & status panel.
Managing queue members and their confirmations are explained in Supervision.
Group call pickup lets you take a call ringing in an authorized group. Check the group and the call before starting the pickup. The listening commands for another agent are detailed in Supervision.
Tracking queues and agent status
If you are an agent for at least one queue or a supervisor, the Phone tab displays the Queues & status panel. It only shows queues your account has rights to. Without this role, the panel does not appear.
At the top, four summary cards summarize the situation:
| Counter | What it shows |
|---|---|
| Connected agents | Agents connected to your queues |
| Disconnected agents | Agents in your queues who are not connected |
| Waiting calls | Calls waiting for an agent. As soon as a call is waiting, the card turns red. The number no longer pulses and the card no longer shows the longest wait |
| Calls today | Sum of calls received since the start of the day across the queues in your scope, in the client's time zone |
The Live badge is no longer displayed in this panel. A counter showing "—" is not a zero: the reading is incomplete or too old. Figures update approximately every four seconds.
The Calls table presents one row per queue:
| Column | What it shows |
|---|---|
| Queue | Queue name; click to expand or collapse its calls |
| Waiting | Number of calls currently waiting |
| In progress | Number of calls in progress, shown in a badge |
| Avg. wait | Daily average of queue wait times for all calls that have exited: answered, abandoned, or exited without answer, including after overflow; "—" without measurement |
| Answer speed | Average wait before answer for calls answered during the day |
| Agents | Connected agents out of the total agents in the queue; being connected does not guarantee availability |
| Answer rate | Answered calls divided by calls with a known outcome in the queue for the day, multiplied by 100; calls still without an outcome are excluded; "—" without any resolved call or usable data |
Click the arrow or the name of a queue to expand its calls. The detail presents the Number, Queue, Status, Duration, and Agent columns, centered. Status is written in a badge; the queue is shown as text. The Waiting and In progress counters are oval; only the outline of the waiting counter pulses when a call is waiting. The queue name is also visible to a non-supervisor agent. Headers allow sorting; the funnel icon opens a filter, and Reset removes it. The team Calls table has been removed from this page: tracking is done in the per-queue table.
Tables adapt to the panel width without horizontal scrolling. On a very narrow panel, some average columns are hidden; widen it to see them again. In light theme, their background is white and the headers are slightly tinted.
The Connected agents table shows agents in your scope, including those disconnected. It displays the agent, Status, Duration, Answered today, Avg. duration, Answer speed, and Queue. Offline designates a non-connected extension, including in the filter. The agent's photo appears when available; otherwise, their initials are shown. The internal number is no longer repeated below their name in this phone table. The table can be sorted and filtered; averages are sorted by their duration.
Answered today counts queue calls answered by the agent during the day, as a simple figure. The former summary badges for online, on break, and offline above the table are no longer shown; check the Status column instead. Avg. duration shows the average duration of completed conversations attributed to the agent during the day, including direct calls; Answer speed shows their average wait before answering queue calls. An agent sees their own figures in these three columns; colleagues' figures remain "—". A supervisor sees figures for the entire team within their scope.
Duration remains "—" in this view when the status duration is not provided. Personal statistics are reloaded approximately every thirty seconds. A missing, outdated, or errored measurement remains "—", never an assumed zero. Averages exclude missing measurements and include durations actually measured as zero.
The Status text stays gray; only the badge carries color: green for available, red for on call, amber for ringing or on break, gray for disconnected or offline.
The queue's Avg. wait and Answer speed cover different populations: the former includes all measured exits for the day, the latter only answers. Calls still waiting feed the live counters, not the day's average exit time. For example, four calls received with one answered give an Answer rate of 25%.
In case of a temporary reload interruption, the phone automatically retries before showing an unavailability message. If part of the data remains inaccessible, the message and Retry remain visible outside scrolling tables, including on small screens. Click Retry once the connection is restored. Access denials and action failures require addressing the indicated cause. An empty table with the Live label, on the contrary, means there really are no calls.
Using shortcut keys
Show BLF keys opens Shortcuts (BLF). A BLF key is a shortcut that can also show its destination's status.
- Search for a contact or filter All, Available, Busy, Offline, or Unknown status.
- Check the key type.
- Click Call for a number, Pickup for a ringing call, or Toggle for a switch.
- For a forward, check the active or inactive state and the destination before using the key.
- Use Previous page and Next page if multiple pages exist.
Copy number copies the destination when this action is available. Add favorite from directory opens contacts. Show favorites, Hide favorites, and Hide BLF keys do not change the key configuration.
The BLF keys and favorites panels collapse separately; an overly long name is abbreviated, hover over it to read it in full. On a wide screen, widen the panel by dragging its left border. BLF shortcuts and favorites are distributed across multiple columns based on panel width; widen it to display more columns. The number of keys per page adapts to available width and height; use pagination to reach the other keys.
Ringing indicates an ongoing ring; for a user or extension key with a fresh measurement, the action may pick up this call. A key with unknown status does not make other keys unknown. A clock offset on the extension no longer grays out all freshly received keys. An outdated or unavailable measurement remains Unknown status.
A key without a status measurement should not be interpreted as available. A failed favorites reload has its own retry.
Resuming on another device
On my other devices shows calls received on your other extensions. Pull here requests their transfer to this device; a usable device destination is required. Wait for the actual pull result.
Ring my other devices, during an established call, searches for other connected devices then requests their ringing. The cancel command stops this request. The absence of another connected device is reported.
In Settings › My calls, under Mobile simultaneous ring, enter Mobile number, then use the common Save button. International format is recommended; leaving it blank records the absence of a mobile number. The result also depends on your telephony configuration. The mobile also rings for external calls; it does not ring if your busy forwarding applies, nor for unknown callers when call screening is active (a warning is shown in the setting).
In Settings › Mobile and devices, Connect my mobile displays a single-use connection code after request. Scan it with your organization's app before the displayed expiration. Request a new code if needed. Never share this code or its screenshot.
The shared extension code, when offered, consists of four to twelve digits, or may be left blank. Use the temporary display to verify the entry then hide it; Edit only appears after a change. This code must remain confidential.
Testing audio and fixing the microphone
In Settings › Audio and headset, Audio test lets you check microphone and speaker: click Start, speak for three seconds then listen to the playback. Stop interrupts the test.
If the chosen output cannot be used, the app may play the test on the default output while warning you. "Unable to play the test recording." asks you to check the output and permissions.
When disconnected, the app attempts to use another microphone. The banner indicates whether the switch succeeded, was saved for the next call, or failed. Close hides the banner, without fixing the audio. See Audio.
Recording, transcribing, and translating
The recording command requests its start or stop for the established call. When recording is active, the pause and resume commands act on it. The retention request, when offered, is a request to the service; then check Recordings.
The Live transcription panel starts reading when opened. Stop suspends it; the start command resumes it. Choose Target language and enable or disable Translation. "Waiting for speech…" indicates no segment has been received yet. Unavailability for the current call is displayed as such.
Copy copies the text; Export downloads a text file. The Transcriptions section temporarily keeps recent texts in this tab.
For a recorded transcription, choose the target language then Translation; changing the language clears the previous result. AI Summary lets you request a recording's summary and reload an error. Review these texts before sharing them.
Opening management during a call
Depending on your rights, click Management space or Administration in the menu. The space opens in a separate tab, or in a second window of the desktop application. The call continues in the phone: keep its window open. If "The browser blocked the window." appears, use Open in a new tab. See Navigation.
Presence, theme, and notifications
Click your avatar in the top bar to open the profile menu. Its header shows your photo, name, and email. Change photo on the avatar opens the image selection and uploads it; Delete removes the existing photo. Wait for the upload to finish; in case of error, choose a valid image of 512 KB maximum. Closing the file picker without a selection does not change the photo. Sign out is at the bottom of the menu.
Status is set in this menu; there is no longer a presence selector in the top bar.
- Click the status row to expand the choices.
- Click the desired standard or custom status: it applies immediately, with no time limit.
- In the Duration area, then choose the duration of the active status. This does not change the selected status.
- Check the displayed expiration after the server's response.
| Field | Purpose | Possible values | Example |
|---|---|---|---|
| Status duration | Sets the expiration of the active manual choice | No limit, 15 min, 30 min, 1 h, 2 h, Today, Custom duration (minutes) | 30 min |
| Custom duration (minutes) | Enter a duration then confirm it with Apply | Integer from 1 to 43,200 minutes | 45 |
Today sets the expiration to midnight at the start of the next day in your display time zone. No limit removes the expiration. An empty or invalid custom duration disables Apply. Choices wait for the update to complete; they do not require the Save settings button.
At expiration, the server restores the situation remembered before the duration was applied, even if the phone is closed. In this flow, the status has already just been applied with no limit: the expiration therefore does not guarantee a return to Available or Automatic. To resume automatic rules, click Automatic in the same list. The duration area is then hidden; your status follows your activity and calls according to Settings › Presence and schedule. A call or another higher-priority rule may determine the actually displayed state.
Creating and editing a personal status
- Click Create a status below the list.
- Fill in the name, optional emoji, and associated status.
- Click Save, then click the created status in the list to apply it.
| Field | Purpose | Possible values | Example |
|---|---|---|---|
| Name | Identifies your status; required | Single-line text, 64 characters maximum | On the move |
| Emoji (optional) | Accompanies the name | 32 characters maximum | 🚗 |
| Presence | Defines the associated state | Available, Away, Busy, Do not disturb; Available at creation | Away |
You can keep up to 20 personal statuses. The pencil icon opens editing; Save keeps it, Cancel closes the editor. Delete directly removes the edited status, without confirmation. Commands are unavailable during the operation. An empty name prevents saving. If "Your personal statuses could not be loaded." appears, use Retry; standard choices remain accessible.
Below expanded statuses, enter a comment, limited to 160 characters, for example "Back at 3 PM". Enter or leaving the field saves it; clearing the field then leaving it removes it. Check the value after reload in case of error.
The badge on your avatar, BLF keys, colleagues, and chat show presence. Do not disturb is represented by a red disk crossed with white.
In Settings › My profile and display, Theme offers System preference, Light, and Dark. The theme command in the header toggles between light and dark.
The Language choice and Menu position are also found in My profile and display; see navigation settings.
In the same section, Time zone reflects the personal time zone or the client's default. Choose then use the common Save button; the button waits for a change. This setting changes how times are displayed.
The Notifications bell opens personal notifications. Refresh reloads the list; Mark read changes the notification's status. Previous and Next browse pages of twenty. A failed reload is different from No notifications.
Blocking and screening calls
In Settings › Who can reach me, under Blocked numbers, fill in Number to block and optionally Name or note, then Block. A non-empty number is required. Edit reloads the values; the form's Edit button applies them and Cancel abandons the change. Unblock directly removes the number. The search filters the list.
On the same screen, enable Reject hidden calls to reject these calls for yourself. The change is immediate: wait for "Setting saved". The switch waits for the save to finish; in case of a read error, retry, and in case of a write error, read the displayed reason then check the value after reloading. Disabling it does not lift a block imposed on the entire client.
A hidden call shows an absent, anonymous, private, restricted, unknown, or unavailable number, or an identity hidden by signaling. A display name alone or the caller's absence from your directory is not sufficient. Internal calls, inter-PBX calls, and emergencies are not affected. During the 24 hours following an emergency call attempt from the client, incoming hidden calls remain accepted by this setting to allow emergency services callback. See also the client setting.
A rejected direct call is declined by the network, without a voice announcement from the PBX; the tone or message depends on the caller's operator.
In Identify unknown callers, you can request their identification, choose French or English, and enable name transcription if the service is available. The greeting sound is the client's: you cannot choose it here. The person who manages telephony sets it in General settings › Calls & voicemail for all users.
| Field | Purpose | Possible values | Example |
|---|---|---|---|
| Ask unknown callers to identify themselves | Enables identification | Enabled or disabled | Enabled |
| Screening language | Language of the announcement | French or English | French |
| Name transcription | Transforms the recorded name into text | Enabled depending on the AI service | Enabled if available |
Click the common Save button, or Restore to immediately revert to the client default. The unknown caller records their name; during screening, 1 accepts, 2 rejects, and 3 sends to voicemail. No response goes to voicemail. If the AI voice is missing, the standard announcement may be used.
The forwarding banner indicates a known systematic forward when you have no ongoing call. Its cancel command reloads then disables this forward and checks the result. In case of failure, the banner remains: do not assume the forward is cancelled.
Connecting external accounts
In Settings, open Contacts and shortcuts. For an offered contacts provider:
- Click Connect.
- Allow the browser's connection window.
- Grant access in the provider's window.
- Return to the card and check the status, contact count, and last sync.
- Use the sync command if offered for a connected or errored account.
If no application is configured, ask the person who manages telephony to prepare personal contacts. Disconnect requires confirmation. Once confirmed, syncing stops; depending on the provider, the panel may also ask you to revoke authorization in the indicated consent portal.
The choice of contact sources determines the offered searches. An unread or errored source does not equate to an empty address book. In Mobile and devices, browser extension installation commands open the offered installation links; their availability depends on the detected browser.
Protecting the user account
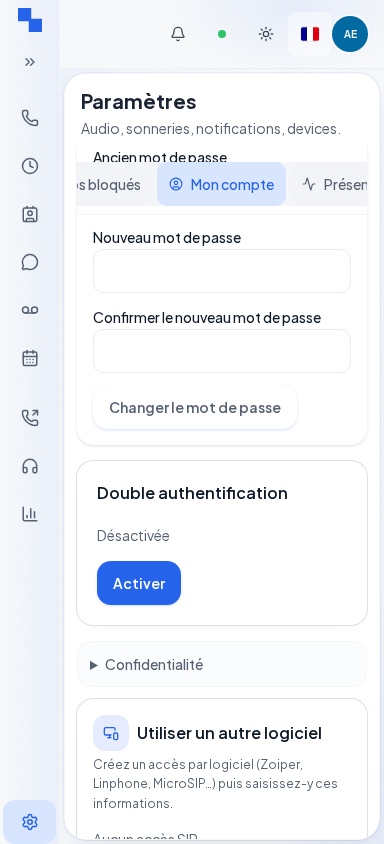
In Settings › Security, under Two-factor authentication, click Enable, scan the QR code or copy the key into your authenticator app, then enter the 6-digit code and Confirm. Cancel closes the setup without activating.
Keep the single-use Backup codes with Copy or Download, then I have kept my codes. They will only be displayed once.
Regenerate backup codes requires Current password and replaces the old codes. Disable, when permitted, requires the password and a temporary code or a backup code. The mode switch button clears the code entry. If your organization enforces two-factor authentication, disabling is not offered.
Using meeting controls
First join a meeting from Meetings. A Waiting room means the host must allow entry; Leave lets you depart. The bar, participants, chat, and floating window are described in Meeting room.
The More button on the bar gives access to the following functions:
| Command | Procedure and effect |
|---|---|
| Private meeting | The host checks or unchecks the box; see Private or public meeting |
| Record | Opens recording tracking for the host; see Meeting recordings |
| Background blur, Disable blur | Change processing of your camera; wait for loading |
| Whiteboard | Opens a board shared with everyone present; see Whiteboard |
| Annotate screen | Draws on the image of a shared screen; see Annotate a shared screen |
| Q&A | Enter a non-empty question, send it, vote for an open question; the host can mark it answered or remove a question |
| Create a poll | The host enters a question and at least two options, adds or removes options then Launch; Cancel abandons it |
| Poll in progress | Choose an answer; the host Close stops voting and leaves results visible |
| Breakout rooms | The host chooses Number of rooms, then Distribute and open; internal participants are distributed and guests remain in the main room |
| Breakout room open | Return brings you back to the main room; the host Close rooms ends the breakout rooms |
Host tools only appear with the corresponding permission. A failed action shows its diagnostic; opening a panel does not confirm a server-side action.
In Participants, the host can Admit or Deny a person waiting, Mute mic directly on a participant's row and, in the More menu of this row, Remove, Request screen share, Make co-host, or Remove co-host role depending on available commands. Lock room prevents new entries; Unlock room lifts this lock. Closing the panel does not remove anyone.
Take control, in this same menu, sends a control request. The recipient sees Control takeover request and chooses Accept or Decline. Remote control requires the recipient's desktop application. Stop (Esc) lets you regain control; the other participant also has Stop. A sent request is not consent.
Commands shared with conversations and tickets
Chat files can be viewed in the conversation's files panel. Choose the file to download it and check the error if retrieval fails. Export conversation, in actions, downloads the export; a refusal means no file was produced.
For the external channel that offers quick replies and button templates, the Read and typing indicator commands act on the external contact. The Type choice allows quick replies or button templates, optionally with an image. Enter the text and reply titles, then send. Text limits vary: 2,000 characters for replies, 640 for the button template, and 80 for the image template. Check Send not confirmed before retrying.
The external messaging actions panel lets you choose a journey template and enter text up to 1,024 characters maximum. Send requires the template and the text. Forwarded to provider does not mean the recipient has replied; read the Replies in the panel.
Personal support attachments are added to an already saved message. Choose an accepted file, check its name then start the import. The cancel command removes the preparation. In case of an uncertain result, refresh the list before retrying the import. The cancel command interrupts the local request; then check the remote result. A saved file's name is used to download it.
Checking the result
For a call, check the actual status and your caller's voice. For a transfer, conference, pull, or recording, wait for the observed result. For a setting, reload the saved value.
If this does not work
Note the time, the anonymized contact, the action, and the exact message. A network loss may leave a call or operation in progress. Retry or Reload status resumes the relevant reload; closing an alert does not fix the problem. See States and access and Personal Settings.