
Open the client list
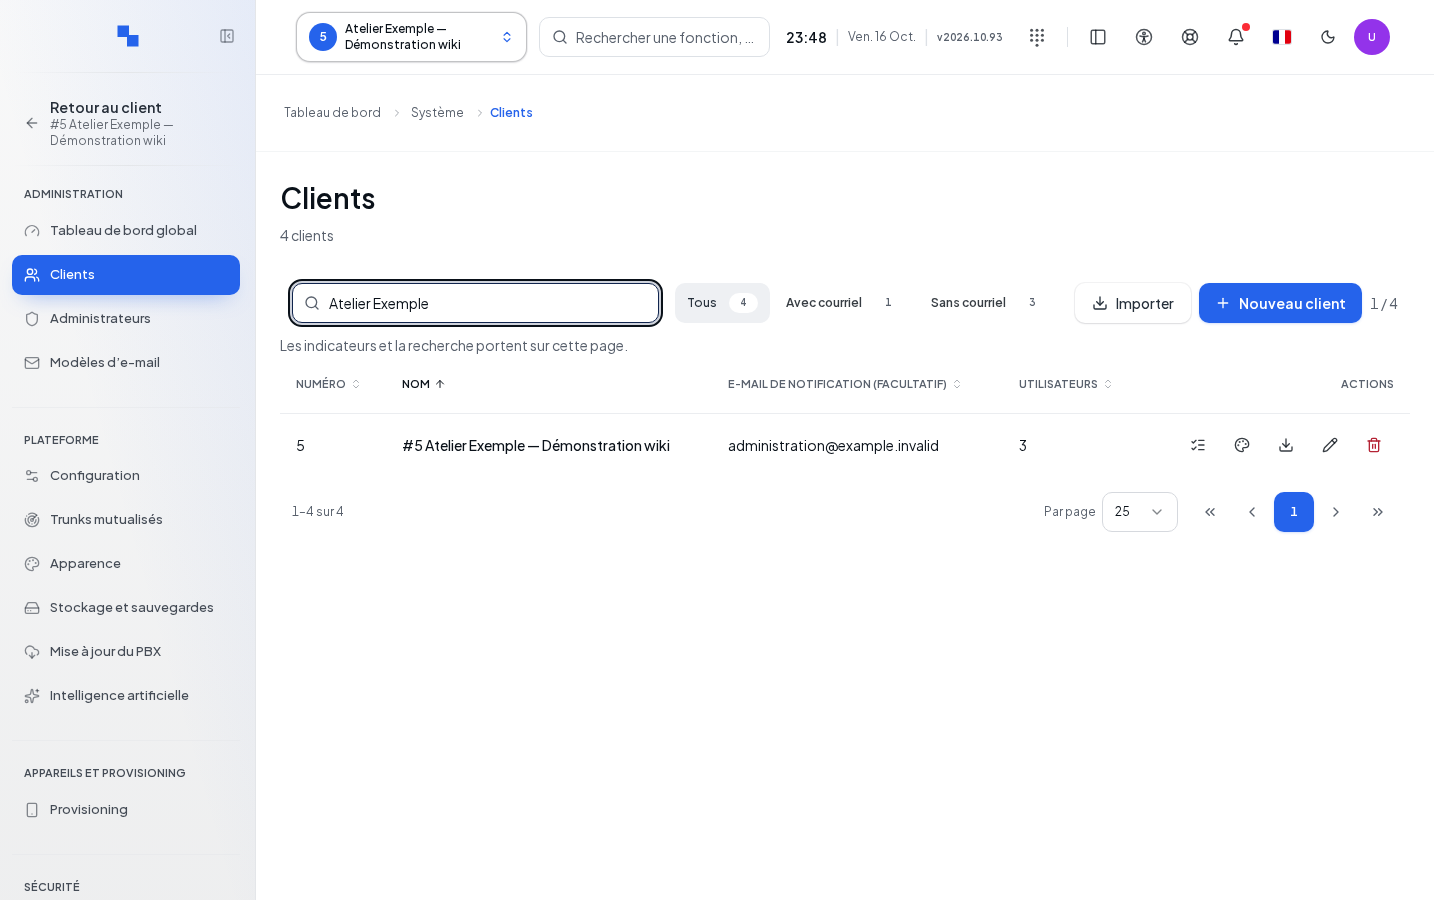
A client is a company space within your Informatique Facile PBX installation. Its users and telephony settings belong to this space. The Clients page is reserved for the installation administrator, including for read access.
- Log in to the administration panel.
- Open Clients in the System section.
- Wait for Loading… to finish. Access denial requires an authorized account; a supervisor role is not sufficient.
Search for a client filters the loaded page by name, short identifier, country, or number, ignoring case and accent differences. The All, With email, and Without email filters also apply to the clients on this page. Use pagination to view other pages. Changing page or page size clears the search.
The table displays Number, Name, Notification email (optional), Users, and Actions. Sorting is available on the first four columns. A dash replaces missing data. No results may result from the filter: clear it before concluding that no client exists.
Create, view, and edit a client record
- Click New client. From the top bar selector, Add a client also opens creation.
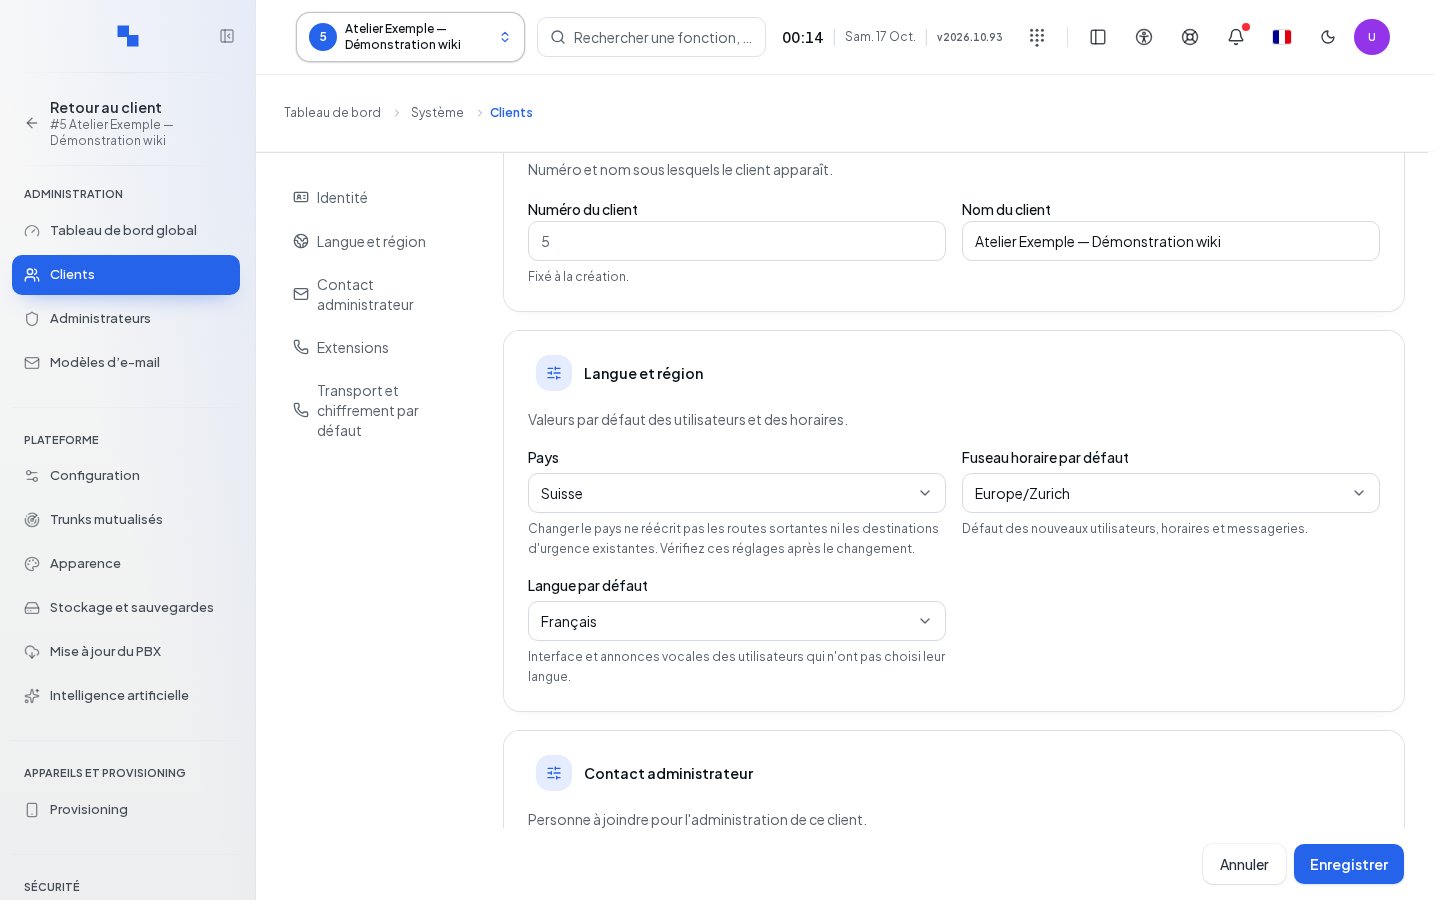
- Browse Identity, Language and region, Administrator contact, Extensions, and Default transport and encryption. These controls scroll the form; they do not save anything.
- Fill in the fields below.
- Click Save. The button is disabled while saving is in progress.
- After creation, continue with the Set up the client flow that opens for the new client.
To view or edit an existing client, click its name, its row, or Edit. This action selects this client in your administration context. Verify its identity before changing a field. Cancel closes the form without submitting changes via Save.
| Field | Purpose | Possible values | Example |
|---|---|---|---|
| Client number | Identifies the space; fixed at creation | Integer from 1 to 2,147,483,647; suggested automatically; leaving it empty allows automatic assignment; cannot be changed afterward | 120 |
| Client name | Visible name; required | Non-empty text | Sample Workshop |
| Country | Prepares dialing rules; required | A country from the selector | Switzerland, for a Swiss client |
| Default time zone | Default for new users, schedules, and voicemail boxes | A time zone from the catalog; suggestion derived from the installation | Europe/Zurich |
| Default language | Interface and announcements if the user does not choose their own language | Language from the selector; French initially | French |
| Optional administrative contact | Email address | administration@example.test | |
| Phone | Optional administrative contact | Phone number of the contact person | Your contact's number |
The number is suggested while the form is opening. If this suggestion fails, you can enter a number or leave automatic assignment in place. The name and country are validated before submission. Selecting the country may suggest the time zone as long as you haven't explicitly chosen one.
Changing the country of an existing client does not rewrite its outbound routes or emergency destinations. Check these settings separately. The administrative contact on this record does not create any user account and does not grant any administration rights.
In Extensions, the record reminds you that an internal number has 2 to 8 digits. In edit mode, Emergency numbers forbidden as extensions displays the list in read-only mode. If it is empty, the message about the absence of emergency numbers should prompt you to check the configuration before going live.
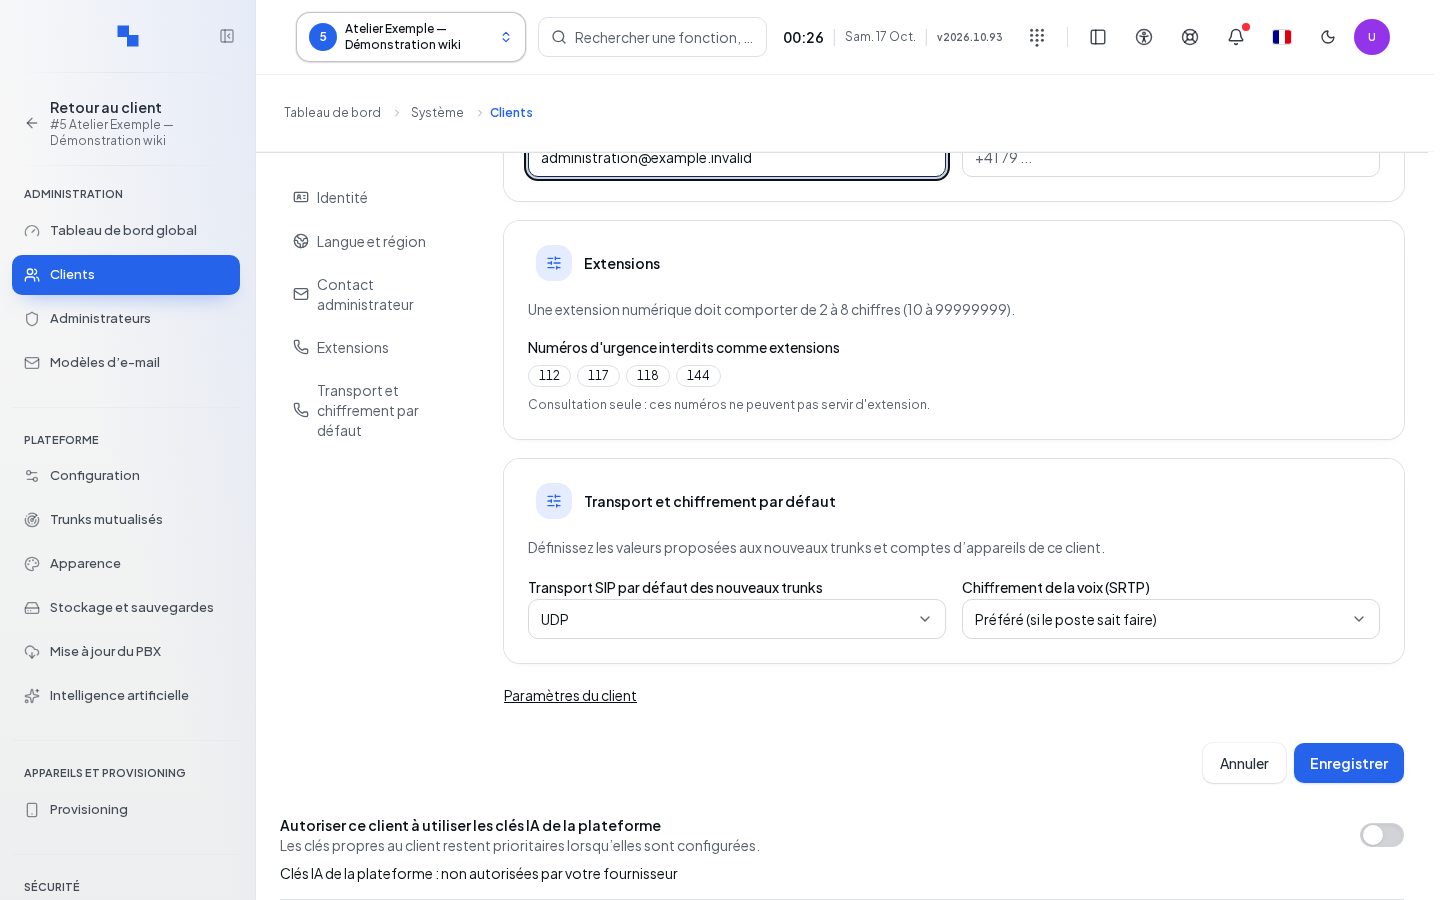
Choose the default transport and encryption
A trunk is the connection to your carrier. SIP carries the messages that establish the call; SRTP encrypts the voice. These two settings therefore do not protect the same thing.
| Field | Purpose | Possible values | Example |
|---|---|---|---|
| Default SIP transport for new trunks | Suggests the transport for new carrier connections | UDP, TCP, TLS; UDP on the creation form | TLS if your carrier accepts it |
| Voice encryption (SRTP) | Suggests encryption for new device accounts | Disabled; Preferred (if the device supports it); Required. Preferred at creation | Preferred (if the device supports it) |
Choose values compatible with your devices and your carrier, then click Save on the record. TLS encrypts signaling; it alone is not enough to encrypt voice. Requiring an unsupported protocol can prevent a connection.
These values apply to new resources created without an explicit choice. They do not prove that all existing trunks and devices have been reconfigured.
Review the default values card
The client's transport card, when available in its settings, shows Default SIP transport for new trunks and Voice encryption (SRTP). It requires a selected client and installation administration rights.
- Wait for the values to load.
- Change a value.
- Click Save, active only if there is a change and no save is in progress.
- Wait for Saved. If other audio settings on the card fail, check their result before leaving.
A failed load displays an error. Refresh is offered for a loading failure that is not an access denial. While loading, do not infer any default value from fields that are not yet available.
Track team onboarding
On the client's row, click Set up the client. The client is selected, then its status is re-read. Loading configuration… means the checks are not finished. Refresh steps re-reads the information; the button is disabled during this read.
Each step offers Open. For Country and time zone, this reopens the client record; for other steps, it opens the corresponding screen. Then return to Clients, choose Set up the client on the same row, then Refresh steps.
| Step | What you should check before continuing |
|---|---|
| Country and time zone | Country, time zone, and language on the record before creating users and schedules. |
| Numbering range | A range of free internal numbers exists for automatic assignment. |
| First user and extension | A user account exists with their email, internal number, and voicemail box; delegate permissions on this account if necessary. |
| Invitation and activation | Create the link from the user menu, check that it was sent, and use the fallback in case of failure; test activation then login. |
| First trunk | Configure the carrier connection with the parameters received and check its status. |
| Outbound routes | Check allowed destinations, prefixes, and the associated carrier connection. |
| First DID | A Direct Inward Dialing number, or DID, is an external number assigned by the carrier; associate it with the correct trunk and a reachable destination. |
| First device or softphone | Associate a device or connect the phone in the browser, then check its registration. |
| Voicemail | Check the PIN code, announcements, and notifications; leave then listen to a test message. |
| Schedules and closure | Check the time zone, open hours, and closed destination, then test both states of inbound routing. |
| First call and log check | Test an internal call, then an outbound and inbound call if the carrier is ready; listen in both directions and check the log. |
Configured means the expected data exists. To configure indicates a missing item. To check requires verification, even if objects exist. Not read indicates that a value could not be obtained; do not treat it as zero.
The displayed license and created resources are not enough to prove that a call works. "Unable to read this step. Try again or open its screen for details." invites you to retry the read or examine the relevant screen.
Export an encrypted archive
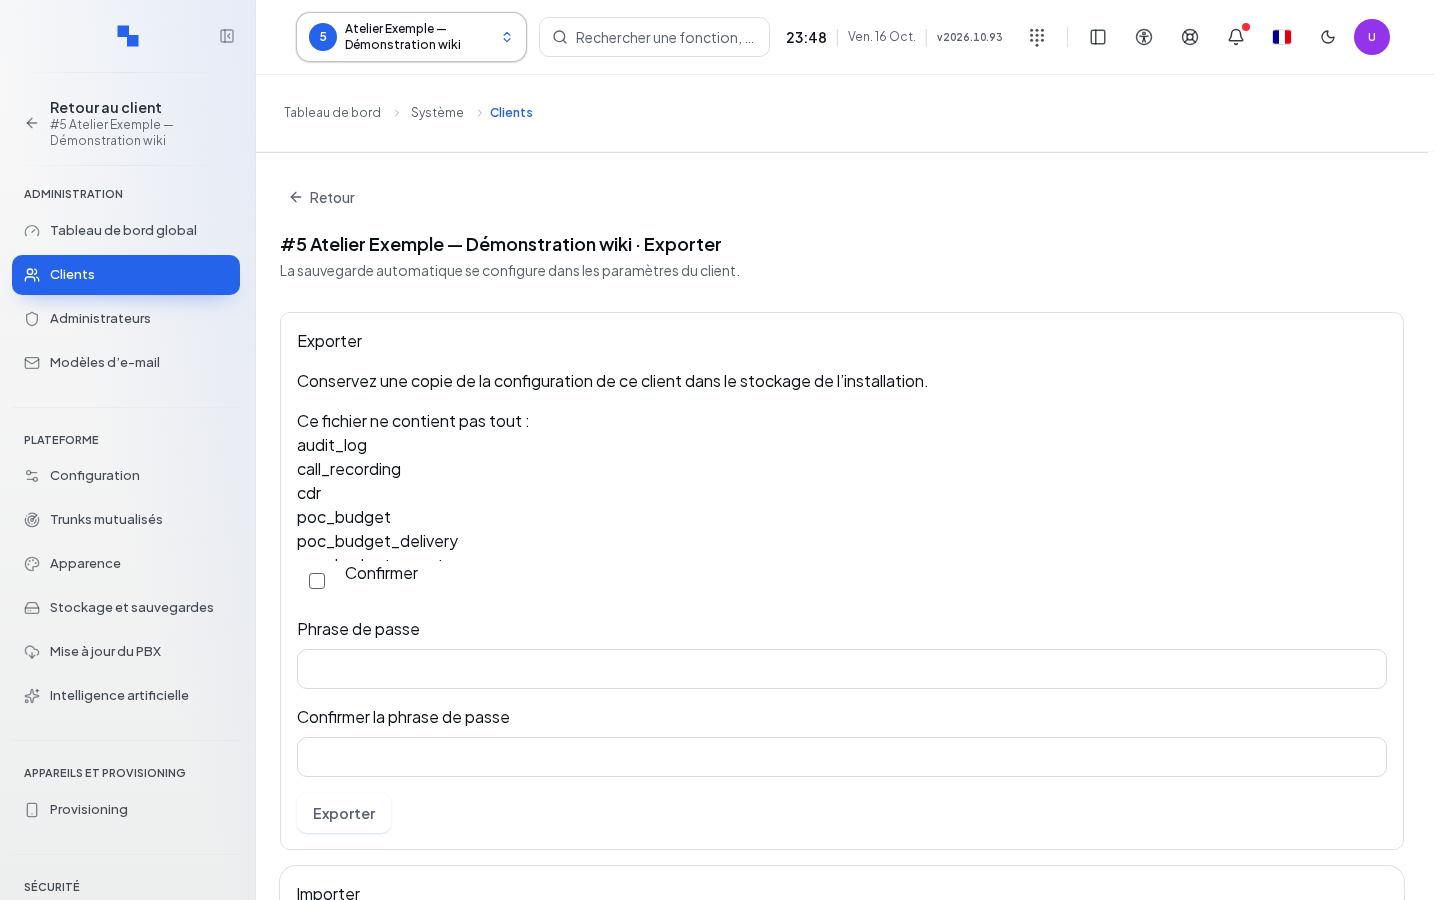
Click Export on the client's row. The panel shows its identity and selects it. It combines encrypted export and import. Export requires backup rights.
- Read the coverage report loaded when the panel opens. If it mentions items outside the archive, read them.
- If you accept a partial archive, check Confirm. This checkbox does not turn omitted items into backed-up data.
- Enter Passphrase, from 12 to 1,024 characters, then Confirm passphrase with the same text.
- Click Export and wait for Export in progress… to finish.
- Check the download of the
tenant-encrypted.jsonfile. Both passphrase fields are cleared after success.
Export is disabled without rights, during submission, before the report loads, if data is unreadable, or if omissions have not been accepted. "The two passphrases differ." asks you to correct both entries.
Keep the passphrase separate from the archive: it will be needed to read it. A partial archive is not proof of a complete client backup. The displayed report determines what was covered.
Import an encrypted file into the selected client
In the panel opened from Export, the Import section receives a local file. It requires import rights and writes into the specified client.
| Field | Purpose | Possible values | Example |
|---|---|---|---|
| Export file | Specifies the archive to read | JSON file, up to 64 MiB | tenant-encrypted.json |
| Passphrase | Decrypts the archive | The phrase chosen during export | Enter it without sharing it |
| Restore mode | Chooses how data is written | Merge: add and update; Replace the backed-up configuration | Merge is selected by default |
| Confirm | Authorizes writing after reading the report | Checkbox unchecked at start and after each change | Check it after re-reading the preview |
- Verify the identity of the target client.
- Choose the file, enter its passphrase, and select the mode.
- Click Read preview. The button requires a file, a passphrase, rights, and no operation in progress.
- Read the verdict and the numbers to be created and updated.
- Check Confirm, then click Import.
- Read the actual summary: creations, updates, and deletions. Then check the affected resources and calls.
Changing the file, passphrase, or mode invalidates the preview and confirmation. After import, the passphrase is cleared.
Replace the backed-up configuration may delete rows absent from the archive in the covered data. The text warns: "Rows absent from the archive will be deleted in the backed-up tables. Other data remains outside the scope of this restore. Inspect the archive before confirming."
Default values for new clients
Open System → Clients → Default values for new clients. These values are suggested to new clients; they never modify existing clients.
| Field | Purpose | Possible values | Example |
|---|---|---|---|
| Country for new clients | Suggests the starting country | Country from the list; required | France |
| Time zone for new clients | Suggests the starting time zone | Time zone from the list; required | Europe/Paris |
Choose the values, then click Save. Cancel reverts to the saved values. The Update time zone, set in Updates → Automation, remains separate. After a read error, use Refresh; an unavailable time zone list does not allow selecting a value.
Import an archive already uploaded to the server
The Import button at the top of the list opens Import an archive into this client. It is disabled until a client is selected; its help text indicates to select a target client. This operation writes into the currently open client. It does not create a client; for a new destination, first create and select the desired space.
| Field | Purpose | Possible values | Example |
|---|---|---|---|
| Archive key | Specifies an archive already uploaded to the server | Reference provided by your administrator; not empty | Your validated archive's reference |
| Write mode | Chooses the method | Merge or Replace; Merge by default | Merge |
| Confirmation below the report | Accepts writing into the named client | Checkbox after the trial run | Re-read the client's name before checking |
- Re-read the target client's name in the panel.
- Enter Archive key. This field does not upload a file from your computer.
- Choose Merge or Replace.
- Click Dry run and read the verdict, quantities, and flagged limits.
- Resolve conflicts or incompatible archive versions before continuing. Unchecked constraints still need to be verified even with a favorable verdict.
- Check the confirmation to write into the named client, then click Import.
- Wait for the summary, which includes created, overwritten, unchanged, and deleted objects. Click Close after reading it.
Import requires a completed trial run, a compatible archive version, no reported conflicts, and confirmation checked. Changing the key resets the report. Changing the mode unchecks the confirmation. Cancel closes the panel before import; closing is blocked during the operation.
Replace announces overwriting records with matching identifiers, with no way back. Back up and have the target client validated before performing this action.
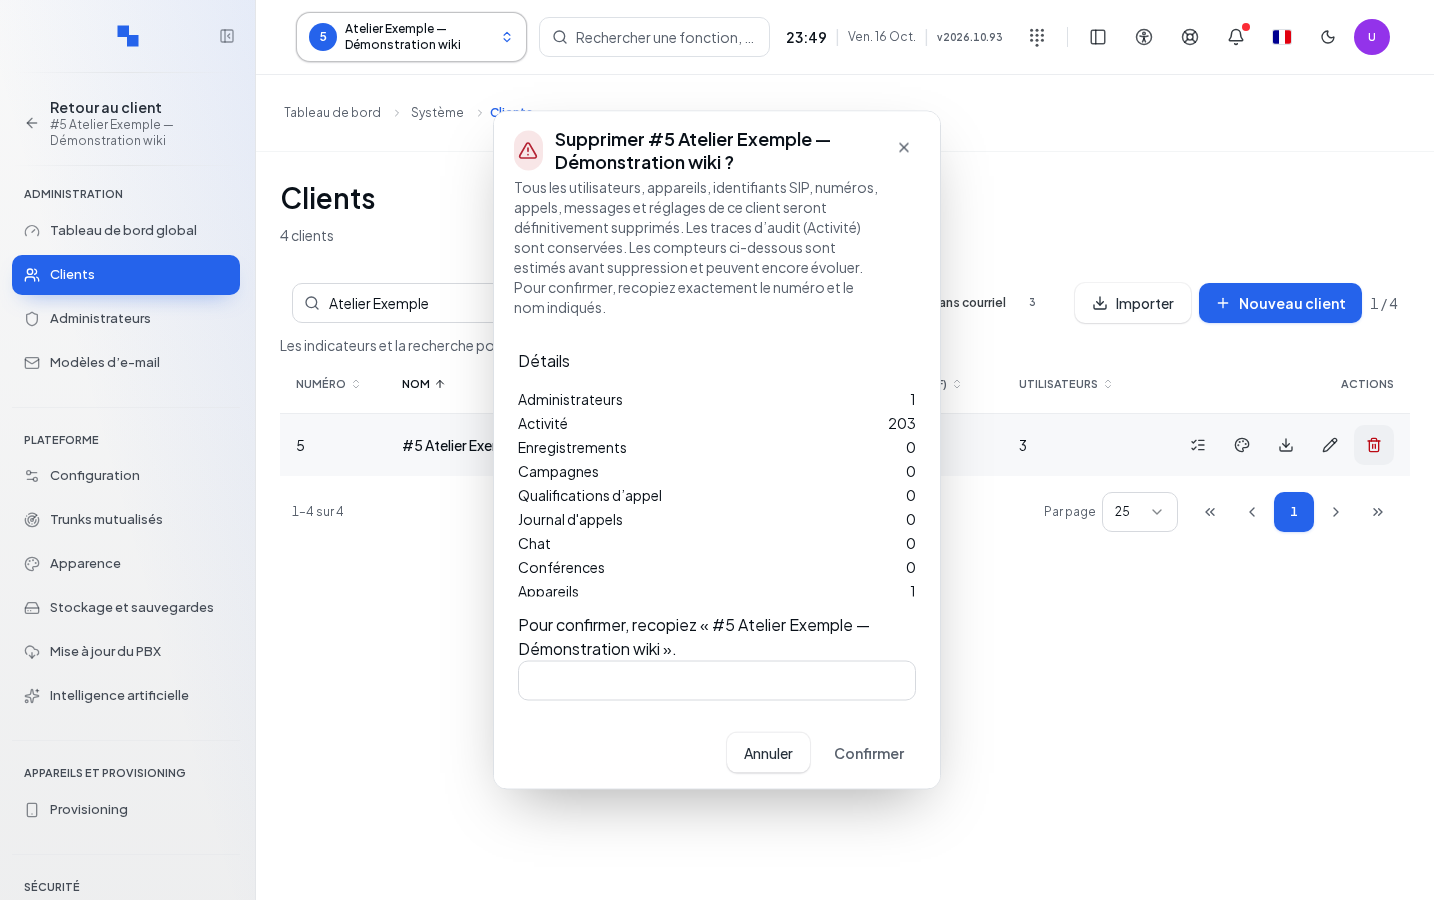
Delete a client
Deletion removes the client and its related data. Do not use it to fix a simple connection problem.
- Open the … menu on the desired client's row, then click Delete.
- Wait for the inventory shown in the confirmation. Read the counts by resource type and the mention of retained items, especially audit trails when listed.
- Verify the identity in Delete #{number} {label}?. The displayed values identify the actual client.
- Retype exactly the identity requested by To confirm, retype "{client}"..
- Confirm the deletion only if this removal is intended, or cancel to keep the client.
Confirmation remains disabled without an inventory or without an exact matching entry. If the read fails, Refresh requests the inventory again and clears the confirmation. A deletion error remains visible; do not conclude the removal succeeded before checking the list. After success, the deleted client is removed from the selected context if it was active.
Open related settings
In an existing record, Client settings opens the general settings for the selected client. In the transfer panel, the link of the same name opens the tab related to recordings and backups. The retention shortcut, when displayed, leads to Installation retention — System section: its scope is the installation.
The row's appearance command selects the client then opens its advanced settings. Always check the space's name before changing its presentation.
Verify the result
After Save, reopen the record and check the saved values. After creation, follow the eleven configuration steps. After import, re-read the summary then test the affected calls, destinations, and voicemail boxes. After deletion, verify the client's absence from the list.
If this does not work
| Displayed message | Solution |
|---|---|
| "The client number must be a positive integer." | Enter only digits within the allowed range, or leave empty at creation for automatic assignment. |
| "Name is required." | Provide a non-empty name. |
| "Country is required (2-letter ISO code)." | Choose the country from the list; you don't need to guess its code. |
| "Time zone catalog unavailable. The current time zone is kept." | Keep the known value and have the catalog read restored before changing it. |
| "You are not authorized to perform this action." | Have the account and its rights checked; resubmitting does not change them. |
For an import error, keep the verdict and the counters, without the passphrase. A list loading error is not an empty list. See States and access and Navigation.